So recently I experimented with exporting object animations from Blender to Unreal. I had specific needs in mind, so I had to make a costum solution for it, relying on custom shaders and textures.
In this article I'll go over my process, technical limitations I had to work around, and how I achieved the desired result.
The benchmark scenario I had in mind was a collapsing wooden bridge, shown below. It has 393 individual pieces, and 100 frames of animation.
Disclaimers
- having fun is a big factor in doing this. I'm sure there are easier ways to achieve this out there, especially using Houdini. But sometimes it's fun to reinvent the wheel or do it the hard way at least once, as a challenge. I used a lot of Python scripting for it.
- Some of my performance concerns, limitations and requirements might not be the same as yours, so keep this in mind if you are seriously considering doing something similar.
- This is more of an overview explanation, and it doesn't explain the entire process and code in detail, or share usable project files or code. If you have a decent tech art background, you will be able to piece together everything you need to do it yourself.
What I needed
A simple, performant, and reasonably straightforward way to export object animations (no armature or deformations) and use them in Unreal Engine. I used example in the video above : a rigid body simulation with 383 individual objects. All the animation is baked into object transforms.
One additional (and important) feature I needed was the options to give pieces a different time. For example the parts closer to the player should be at the time 0.0s, before the structure collapses, and the pieces that are far enough shuld have the time 5.0s, at the end of the collapse. I'm not sure if there's a name for this, but I'm calling it "non-uniform time". You can see it in the demonstration video below.
Everything in the original animation collapses at once. But since I can pick the animation time per individual piece, it makes for a very interesting effect that is not achievable with traditional animation methods.
The available options
I had the following options available to me, all of them had their downsides, some small and some deal-breaking.
- Alembic : export the animation as .abc and use it in Unreal. Performance and memory consumption is unfortunately not the best. This can work for small objects, but anything more complex will be using more than necessary. Also no way to do non-uniform time, AFAIK.
- Armature : there are methods to convert the object animations into a skeletal animation. THis works fine for a few objects, but it does not scale well at all. If you have 390 objects, it means that you need 390 bones, and also store weight data 390x times. It is possible to create a custom animation blueprint to have non-uniform time, but I suspect it will annihilate the FPS due to all the extra processing cost vs doing everything as a simple shader.
- Vertex Animation Textures (VAT): it works, but very wasteful and demanding for this specific use case, and also limited in animation quality. Each vertex data has to be stored, as a consequence the number of keyframes is severely limited, and normal recalculations are performed.
In the end, nothing would fit my use case 100%, so it was clear that I had to develop a custom solution.
My method
My method is closest to VATs. But since all my animations are non-deforming, all I need is to store positions and rotations for each mesh island. If I start with 393 objects and 100 individual keyframes, I'll only need 2 textures for location and rotation (3, if also including scale) with the resolution 393x100. It doesn't matter if the mesh itself uses 4k triangles or 500k, the texture resolution required to store the information only depends on the count of frames and the individual objects.
The data is stored as raw pixel values in .EXRs, as shown below. The values go well beyond 1.0 and even to the negatives below 0.0, so they are not displayed correctly. But the only important thing is that the data is stored correctly.

The rows are used for animation data, and columns for objects. If I want to get the location data of object 4 at the frame 52, I just need to read the pixel at the coordinates {52,4} (if we assume the origin is at the top left, to keep things simple to understand).

I also used the 2nd UV channel for this. I made sure to position the islands exactly in the middle of the pixel, to avoid interpolation issues.

This is a convoluted process, so to make this workflow viable, I made a python script that does it all in one click. It takes the current selection, then generate the .exr textures, create a copy of the objects, reset all transforms, delete the keyframes, and merge everything into a single object. I used the libraries Numpy and OpenCV, in addition to Blender's BPY. You can pause the video to look at the code if you want to.
The script is not the fastest, it takes about a minute to process 390 objects. Funnily enough the slowest part is generating the UVs, it takes ~99% of the script runtime. I tried using different methods for that, but it's slow regardless. It's not a big issue though, waiting a few minutes is nothing.
I implemented a geometry nodes setup in Blender to make sure things work correctly before I ported it to Unreal. The setup is much simpler, since it comes with already made nodes to rotate elements and to deal with normals. As you can see, everything works perfectly.
The GeoNodes setup looks like this

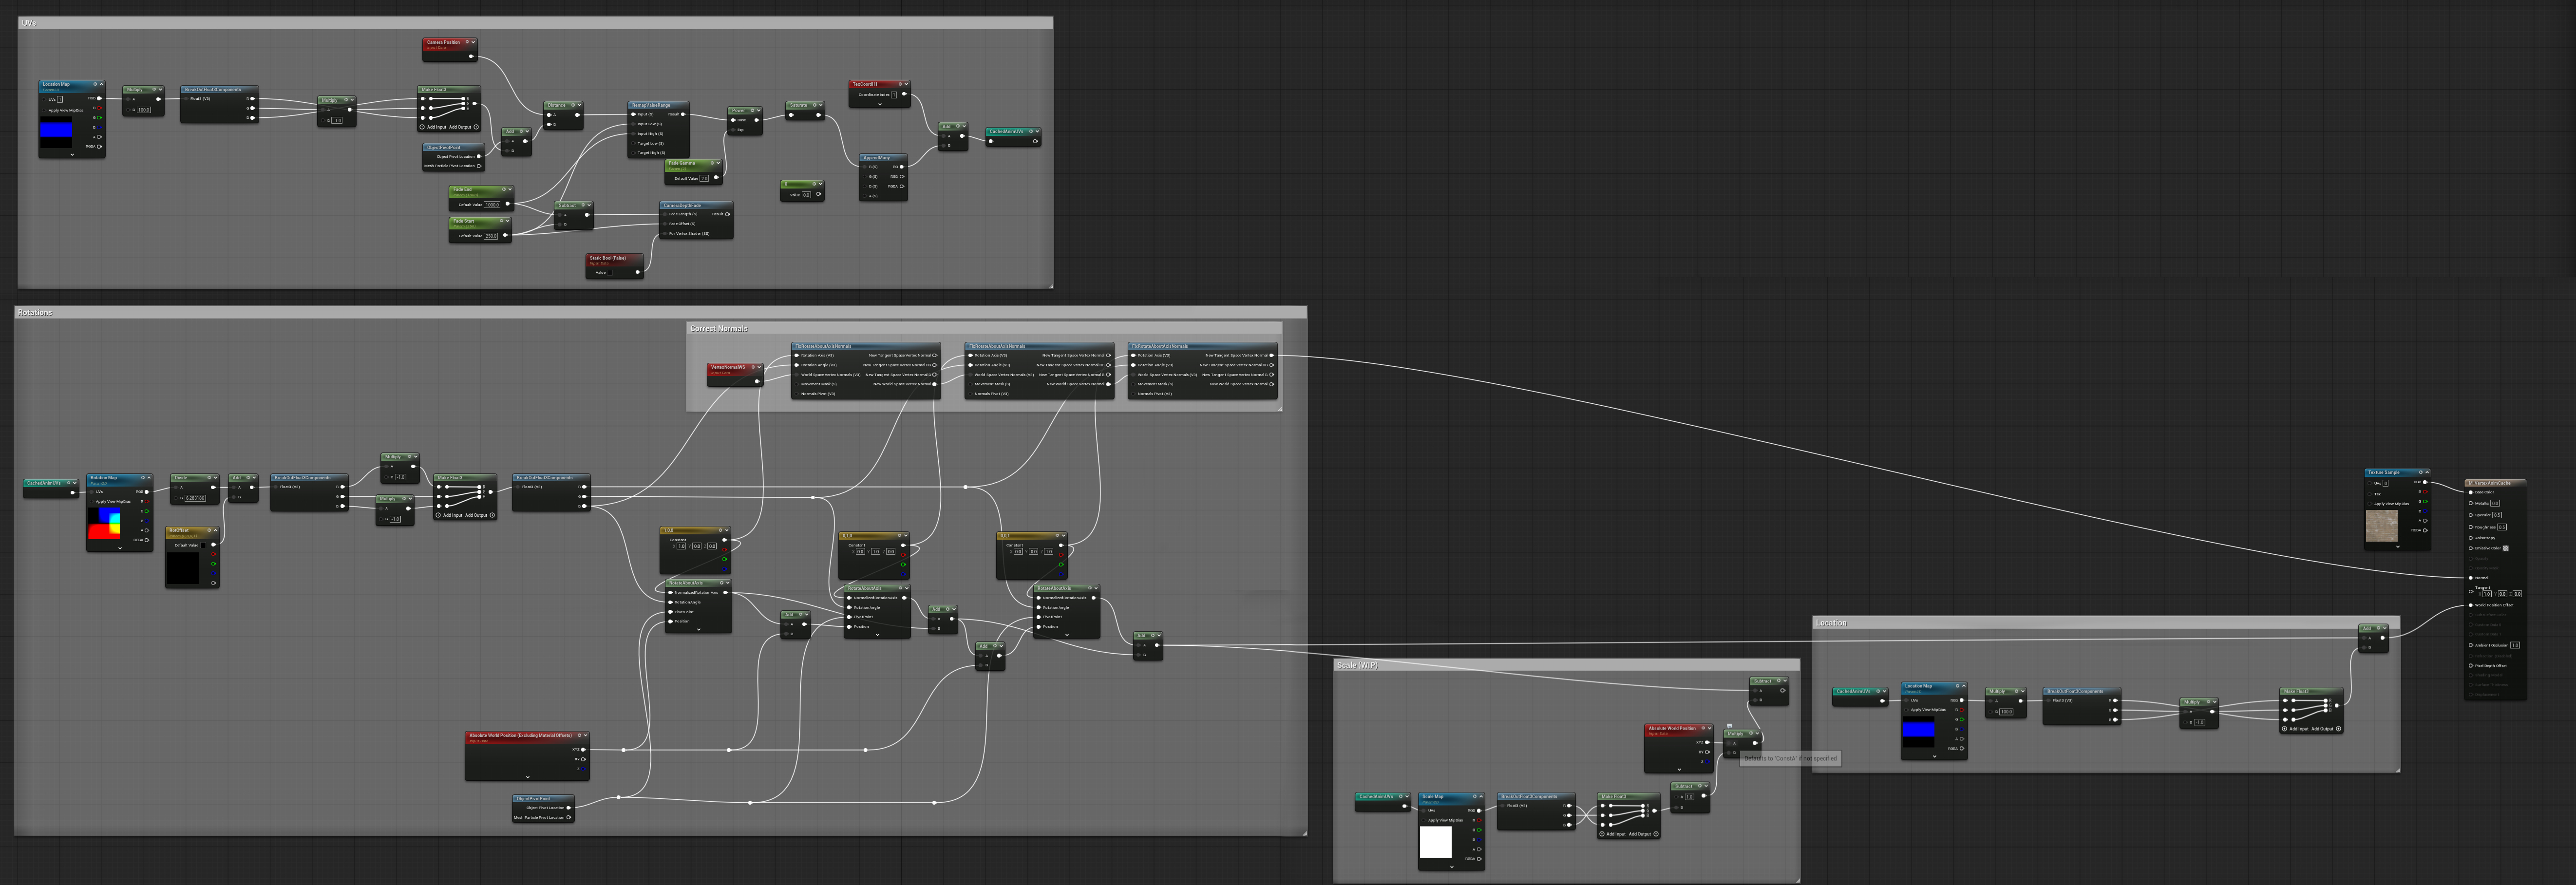
And finally, once I made sure everything works correctly, I created the shader that reads and uses those textures in Unreal. It's still a work in progress, and I haven't implemented some features like scaling and other material textures yet. But the hardest part is done.
(The full resolution image can be seen here https://abdoubouam.com/wp-content/uploads/2025/12/CachedAnimUnrealShader.jpg )

The result
With everything put together, the effect works as intended in Unreal Engine.
The performance cost is only slightly higher than grass wind displacement, and memory cost is next to nothing (eg. 920KB for 390 objects and 100 frames), along with the freedom to control time at no extra cost.
This can be applied to all sorts of object animations, like a clock rewinding, doors opening, sci-fi stairs...etc. If it can be done with object animations, it can be baked and sent to Unreal.
I ran into precision errors when dealing with a large number of objects (more than 1500~2000), even with "Use Full Precision UVs" enabled. I can fix this by disabling texture interpolation, and then doing that from the shader instead (eg. for frame 1.2, sample the frame 1, sample frame 2, and Lerp them at a ratio of 80-20), or forcing the Y coordinate to fall into the nearest grid position. But since it works reliably with up to 1000 objects, I don't think it matters for now. It's ready for use in my game project.
Thanks for reading. Feel free to leave comments and ask questions if something is unclear.